Itinerary: 24 Hours in Otavalo

This post contains affiliate links. If you use these links to book a stay or purchase an item I may earn a commission at no cost to you.

Otavalo is an easy breezy mountain town. There’s not a lot to do here but relax! You can choose to stay a while and rest from your tough adventures but you should definitely visit for at least an overnight to enjoy what Otavalo has to offer.

GENERAL INFO

Getting there and away:

The bus station in Otavalo is right in the centre of town which takes away all of the hassles of getting to your accomodation – you can just walk.

Buses leave regularly in both directions – the trip to Tulcan (to cross the border into Colombia) takes 3 hours but can often get stopped by police so allow extra time. The bus to Quito takes 2 hours. Both ways have amazing views so best to travel during the day!

Accommodation:

We recommend Hostal La Rosa which you can book through Booking.com. It is very centrally located and comfortable.

Top Tip:

If you have some extra time Otavalo is a great town to just wander around. It’s safe, small and quaint plus its surrounded by some gorgeous scenery.

SUGGESTED ACTIVITIES

  1. The indigenous market in Otavalo is the largest of its kind in South America and is definitely the largest in Ecuador. It’s very centrally located in Otavalo and so theres no need to travel to see it – just walk right out of your hotel and you will be there. Best to go to this market early. Also, its more of a photo/sightseeing opportunity than the best place to purchase souvenirs: there are a few unique items but its best not to try to buy Alpaca products here as many are fake (unless this is the only market you are visiting in South America then you will have to take the chance!).
    Early in the AM is the best time to visit and the market closes up around 4pm.

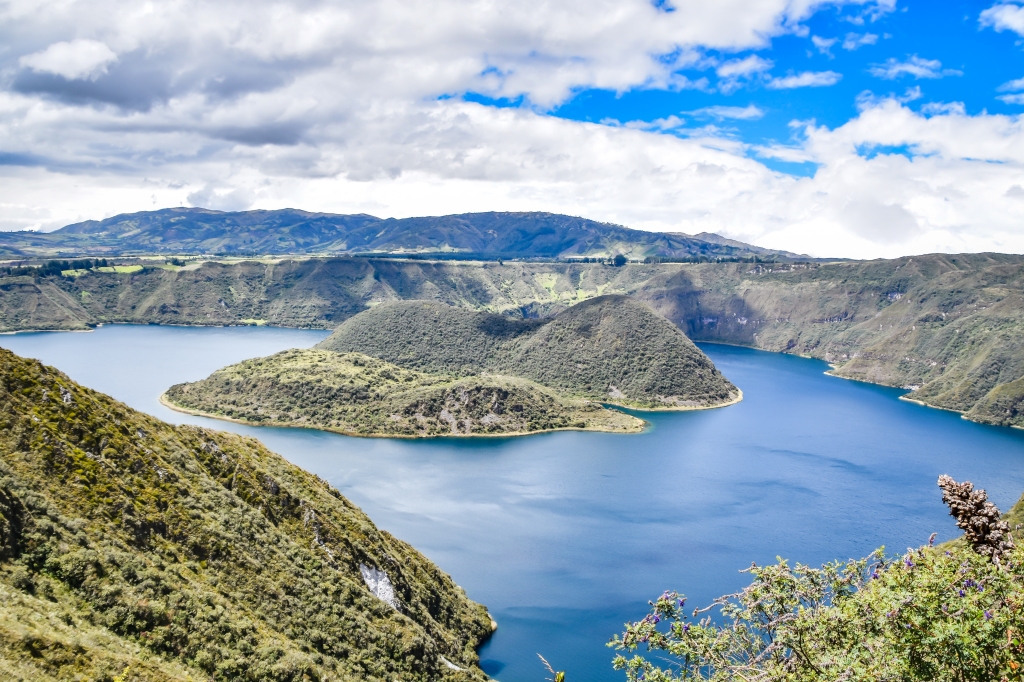
2. Hiking around Cuicocha Lake is a wonderful activity in Otavalo. This is an easy hike that helps you to get used to the higher South American altitudes around an unbelievably picturesque lake. You can probably fit this in in an afternoon after the market if you are fit – if not I would allow a day so that you don’t feel too rushed. See my post on Hiking Lake Cuicocha here for more practical info.

Erika xx

How to: Purchase a Sari in India (from a foreigner that has no idea what she is doing)

dsc_0110.jpg

Although I had no idea  what I was doing I do feel like I was relatively successful in my purchase – so I have developed this guide to buying a Sari in India on a whim. Obviously if you have a local friend how can help or you already know what you are doing then this guide is not for you..

Step 1: Get an idea of pricing – the best idea is to walk into a few shops and get an idea for the price of different materials before you buy. Each shop should have sections for each price range and you can feel the materials and get a good idea of what each should cost before purchasing.

Note on my own experience: This is absolutely not what I did. I walked into one store in which the sales assistants asked me a general budget and started pulling out millions of fabrics to show me and threw them over me to show me how I looked. I fell in love with this one. I do however feel like I managed to get a relatively good deal but I got lucky and should have done some research first.

Step 2: Choose a store away from the main streets (one that a tourist would be unlikely to stumble upon) and purchase from there. You still may get a tourist savvy shop assistant but you are more likely to come across a store that locals shop at with good quality saris.

Note on my own experience: I walked into a store down an alleyway and up a back staircase. There were 5 indian women shopping in there at the time which I took as a good sign and the cheapest saris started from a very low price so I felt i was getting a good deal with my mid-range sari (the material felt fantastic anyway!).

Step 3: Your sari is just a piece of material: Find a tailor and agree on a cheap price to create a bodice (choli) and petticoat (parkar). Yes you do need both of these. The bodice will be made out of some of the material from your sari. Choose a petticoat with a tie waist. The tailor will likely charge you a higher price than you agreed on anyway so make sure to haggle – however bear in mind that they are creating a garment from scratch for you so don’t haggle them down too low just to get a bargain.

Note on my own experience: The price we agreed on was raised when the tailor added extra touches that we hadn’t agreed on like beads on the end of the strings tying the bodice together and intricate stitching. Sometimes it’s easier not to argue and the tailor did get the garment done in 24 hours for me even though it was a public holiday.

Step 4: Wear your sari out! Find someone to help you tie it (even if you look at tutorials from the internet you will likely still get it wrong). Essentially you fold layers of the material and then tuck it into your petticoat; then throw the remainder over your shoulder. You may need some pins to keep it there. You will get lots of stares but its all positive trust me: enjoy embracing the Indian culture!

Note on my own experience: The manager of the guest house I was staying at helped me tie my sari after she saw me about to leave in it and realised the way I had tied it wasn’t entirely correct.

I am waiting for any excuse to wear my Sari again – it’s a wonderful item to bring home from India.

DSC_0097